wxChecksums Shell Extension for Microsoft Windows > Manual
Copyright © 2003-2004 Julien Couot.
http://wxchecksums.sourceforge.net/ShellExtForWindows/
This program is free software; you can redistribute it and/or modify it under the terms of the GNU General Public License as published by the Free Software Foundation; either version 2 of the License, or (at your option) any later version.
This program is distributed in the hope that it will be useful, but WITHOUT ANY WARRANTY; without even the implied warranty of MERCHANTABILITY or FITNESS FOR A PARTICULAR PURPOSE. See the GNU General Public License for more details.
You should have received a copy of the GNU General Public License along with this program; if not, write to the Free Software Foundation, Inc., 59 Temple Place - Suite 330, Boston, MA 02111-1307, USA.
wxChecksums Shell Extension for Microsoft Windows is a shell extension for the Windows Explorer to process checksums' files with wxChecksums. If you don't know what is wxChecksums please go to the wxChecksums' website before continuing with this manual.
Note: In this manual some dialogs will be in french because I cannot have access to a Windows in english language. If you have Windows in english, all the dialogs should be displayed in english.
Back to the table of contents.
wxChecksums Shell Extension for Microsoft Windows 1.1.1 needs that wxChecksums 1.1.1 (or more) is installed.
wxChecksums Shell Extension for Microsoft Windows needs Windows NT with Internet Explorer 5 (or more) or Windows 2000/XP.
A version that should work with Windows 98 (maybe 95 too?) with Internet Explorer
5 (or more) and Windows 98SE/ME is provided but you must install it manually.
I don't have access to a Windows 9x/ME workstation so I can't say if it really
works. :(
The installer can be used only with Windows NT 4.0 (be sure that you have installed Internet Explorer 5 (or more)) and Windows 2000/XP. You need the administrative privileges for launching the installer. At the end of the installation, the installer may ask you to reboot your computer.
Do not install this shell extension in the same directory than wxChecksums.
A good place for installing it is a sub directory where wxChecksums is installed.
For example, the installer of wxChecksums installs it by default in the C:\Program Files\wxChecksums directory
and the installer of this shell extension installs it by default in the C:\Program Files\wxChecksums\ShellExt directory.
If you upgrade the shell extension and if you have modified the global configuration
file (wxcksumsshellex.ini)
make a copy of it before running the installation. The existing file will be
overwrited.
Note that this method is intended to the advanced users.
The ZIP archive contains two versions of the shell extension:
To install the shell extension, follow these steps:
C:\Program Files\wxChecksums\ShellExt.wxcksumsshellex.dll and wxcksumsshellex.ini
from the Ansi or Unicode directory (depending the
version that suits to you) in the directory created in the step 2.cd "C:\Program Files\wxChecksums\ShellExt"regsvr32 wxcksumsshellex.dllThis method is intended to the programmers. The sources come with instructions to compile wxChecksums Shell Extension for Microsoft Windows. Follow the instructions given in the Installation from a ZIP archive section for completing the installation.
Back to the table of contents.
If you have used the installer, use the uninstaller to uninstall wxChecksums Shell Extension for Microsoft Windows. Note that you'll surely need to reboot after the uninstall process.
It's better to uninstall wxChecksums Shell Extension for Microsoft Windows before wxChecksums itself.
If you have installed wxChecksums Shell Extension for Microsoft Windows manually, here's the steps to uninstall it:
cd "C:\Program Files\wxChecksums\ShellExt"regsvr32 /u wxcksumsshellex.dllWhen uninstalling the shell extension (with the uninstaller or manually),
on Windows NT and higher the registery key:
HKEY_LOCAL_MACHINE\SOFTWARE\Microsoft\Windows\CurrentVersion\Shell
Extensions\Approved\{4651C3B8-1503-4edc-8C9A-D0D8DA796737}
(with the value wxChecksums
Shell Extension)
is not deleted. You must delete it manually but if you are unsure what you are
doing or how to do it, leaving this on your system will not cause any harm.
Back to the table of contents.
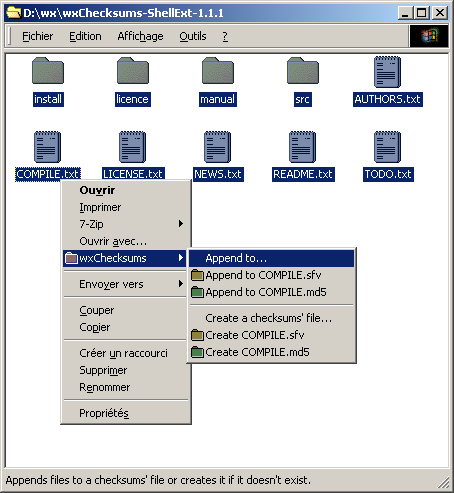
Select one or more file/directory/drive in the explorer and open the contextual menu. A wxChecksums entry in the menu should be displayed:
The Append to... entry permits you to append the selected files to a checksums' file. If the checksums' file doesn't exist, it is created.
The Create a checksums' file... entry permits you to create a checksums' files and append to it the selected files. If the checksums' file already exist, it is overwrited (without any warning message). Prefer in general the Append entries.
The shell extension also provides other entries for quickly append to or create a checksums' file. The name of the checksums' file is created by replacing the extension of the file on which you clicked on when opening the context menu.
Back to the table of contents.
The shell extension uses two configuration files:
wxcksumsshellex.ini is the global configuration file of the
extension. It is placed in the same directory than the extension itself.wxChecksumsShellExt.ini is the user configuration file. It
can be found in the %APPDATA%\wxChecksums directory.wxcksumsshellex.ini contains all the globals settings and the
translations of the GUI. This file is encoded in UTF-8 so be sure to use a text
edition that can read UTF-8 text files.
| Key | Type | Default value | Description |
|---|---|---|---|
Path |
string | Path where the wxChecksums executable can be found. Use this parameter if the shell extension can't find wxChecksums executable itself. | |
Command |
string | wxChecksums.exe |
Name of the executable file of wxChecksums. |
AppendSwitch |
string | -a |
Switch used by wxChecksums to append files to a checksums' file. |
CreateSwitch |
string | -c |
Switch used by wxChecksums to create checksums' file. |
DeleteTempListSwitch |
string | --delete-temp-list |
Switch used to delete the given temporary lists of files to wxChecksums. |
CreateTypeSwitch |
string | -ct |
Switch used to say to wxChecksums which type of checksums' file to create. |
FilesListSwitch |
string | -fl |
Switch used to give to wxChecksums a list of files. |
CfgDir |
string | wxChecksums |
Directory relative to %APPDATA% where the wxChecksums configuration
file it stored. |
CfgFile |
string | wxChecksums.ini |
Name of the configuration file of wxChecksums. |
| Key | Type | Default value | Description |
|---|---|---|---|
UserCfgFile |
string | wxChecksumsShellExt.ini |
Name of the user configuration file of wxChecksums Shell Extension for Microsoft Windows. |
This section is used to convert the languages identifiers of wxChecksums to the languages identifiers of wxChecksums Shell Extension for Microsoft Windows.
wxChecksums Shell Extension for Microsoft Windows use the Microsoft Windows identifiers. A list of these identifers can be found at Table of Language Identifiers of the MSDN website.
Use the following form to make the association:
<wxId>=<wxSEId>
Example:
fr=0x040c
This section is used to say to the shell extension to map a specified language
with another language. For example, the following line:
0x080c=0x040c
Says to the shell extension to use French (Standard) language when the user language is French (Belgian).
The translations sections are identified by the code of the language in their
hexadecimal form. For example: 0x040c for french.
If you make a new translation be sure to leave the %s in the string
that you translate. %s will be used to display a string (a name
of file, for example).
| Section | Key | Type | Description |
|---|---|---|---|
SaveDialog |
LastTypeUsed |
int | Last type of checksums' file choosed by the user. 0 = SFV, 1 = MD5. |
Language |
Id |
string | Identifier of the language to use. Example: 0x04c for french. |
Back to the table of contents.
| Q. | How the shell extension chooses the language to use? |
| A. |
|
| Q. | The shell extension works when I select a few files, but when I select a lot a files, nothing happend. Why? |
| A. | When you select a lot of files, the extension can't give to wxChecksums all of them by the command line. The extension tries to create a temporary list of files in the temporary directory given Windows. If nothing happend, there could be two reasons:
|
Back to the table of contents.
wxChecksums Shell Extension for Microsoft Windows is released under the GNU
GENERAL PUBLIC LICENSE.
See the LICENSE.txt and gpl.txt
files for more details.
Back to the table of contents.
Julien Couot <jcouot@users.sourceforge.net>
Back to the table of contents.
http://wxchecksums.sourceforge.net/ShellExtForWindows/
- wxChecksums Shell Extension for Microsoft Windows homepage.
http://wxchecksums.sourceforge.net/
- wxChecksums homepage.
http://www.jrsoftware.org/
- Inno Setup homepage.
http://www.gnu.org/
- GNU project homepage.